
This setup helps you connect HubSpot to Vieu safely and correctly so your teams can start using relationship intelligence inside HubSpot without disrupting existing workflows.
It’s typically handled by a HubSpot Super Admin or RevOps owner, and it only needs to be done once.
Before you start
Make sure you have:
-
HubSpot Super Admin access
-
An understanding of your Company and Contact properties
-
Clarity on whether you allow new Companies and Contacts to be created
Engineering support is not required.
Here’s a quick video guide or you can follow the instructions listed below at your own pace.
Step 1: Start the Hubspot connection in Vieu
- Log in to Vieu
- Go to Settings
- Click Integrations
- On the Integrations page, you’ll see the Hubspot card.
- Click Connect

Step 2: Authorize Hubspot
You’ll now be redirected to HubSpot to complete authentication.
You’ll be asked to:
-
Log in using HubSpot Super Admin credentials
-
If you manage multiple HubSpot accounts, select the relevant one
-
Approve access for Vieu

On successful connection:
-
The configuration panel will open inside Vieu
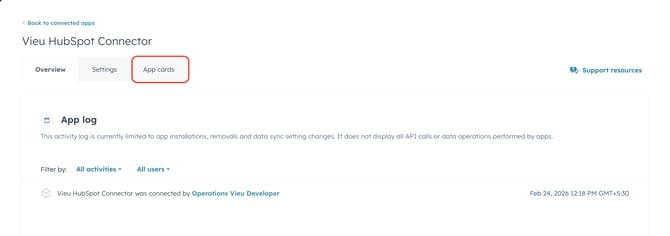
- The Vieu HubSpot Connector app will appear in HubSpot under Connected Apps

Step 3: Place the Vieu App Card on Company and Contact records
After OAuth, the Super Admin must configure the App Card placement inside HubSpot.
There are two ways to place the App Card on Company and Contact objects.
Option 1: From the App Settings screen
1. In HubSpot, go to Settings
2. Navigate to Integrations → Connected Apps

3. Select Vieu HubSpot Connector
4. Click on App Cards
5. Click Manage Locations
A side panel will open with Company and Contact object configuration. Check the Default location for: Contacts and Companies
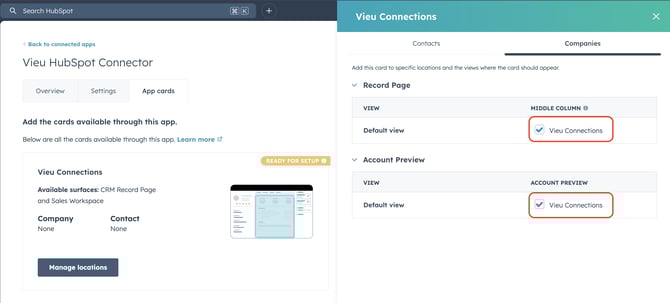
This places the Vieu app card at the bottom of the middle section in the Overview tab at both Company and Contact levels.
Option 2: From the Customize Record View
This provides more granular control over placement.
1. Open any Company or Contact record
2. Click Customize Record

3. Select the View you want to edit

4. Choose the section where you want to place the card
5. Click Add Card → Card Library
6. Select Vieu Connections

7. Place the card wherever required and save
You are now done with the App Card setup 🎉
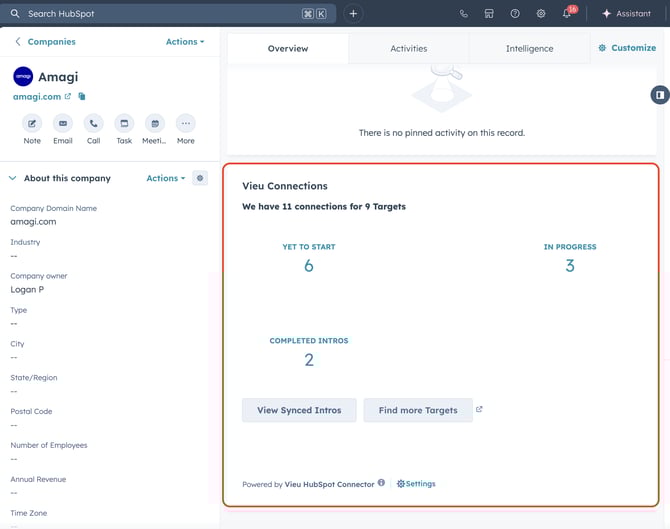
Once placed, the Vieu Connections card will appear directly inside the Company and Contact record view, showing verified connections, introduction status, and pin actions without leaving HubSpot.

After placing the App Card, a HubSpot Super Admin or RevOps owner must review and approve the Properties Configuration. This is a mandatory one-time step.
Step 4: Review and Approve Properties Configuration
This ensures Contacts and Companies are correctly identified and prevents duplicate record creation. You can customize these mappings if your HubSpot instance uses different properties.
Go to: Settings → Integrations → HubSpot → Sync Configuration
Click Save and Next to approve.
Contact Property Mapping
By default, Vieu maps:
-
Email ID → Email
-
First Name → First Name
-
Last Name → Last Name
-
LinkedIn URL → LinkedIn URL
-
Email Domain → Email Domain
-
Account Name → Account ID
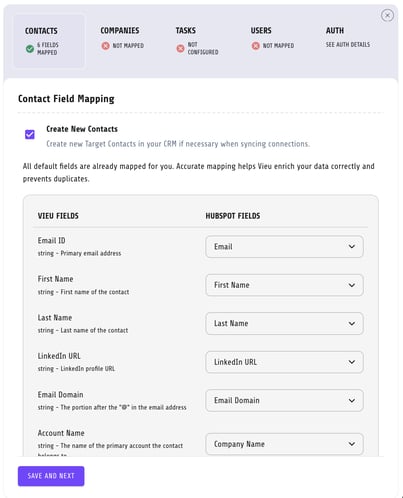
We strongly recommend mapping the LinkedIn URL for accurate identification.
Create New Contacts
By default, Vieu also creates new Contacts and associates them with the Target Company if the Contact does not exist.
If this option is disabled, Vieu will not push Connections to new Contacts.
Note: This option is automatically disabled if Create New Companies is turned off, since Contacts cannot be created without an associated Company.
Company Mapping
Default fields:
Company Name → Company Name
Domain → Company Domain Name
LinkedIn URL → LinkedIn Company Page
Billing Country → Country/Region
We strongly recommend mapping the LinkedIn Company Page.
Create New Companies (Optional)
If enabled, Vieu creates Companies that do not exist.
If disabled, new Companies will not be created.
Task Configuration (Optional)
Vieu can create Tasks to prompt action on warm introductions.
Default:
Task Priority → High
Task Type → Todo
Task Due Date → 5 days
You may customize or disable this.
User Mapping
Users are mapped via Email ID to determine ownership of:
• Connections
• Companies
• Contacts
If no match is found, ownership defaults to the connecting user.
Click Save and Next to confirm.
Step 5 : Surface Vieu Connection Data in HubSpot Company Views
Once the integration is complete, Vieu properties such as Vieu Connection Count become available in HubSpot.
To help AEs, SDRs, and BDRs identify the most reachable accounts, we recommend adding the Vieu Connection Count property to your Company views.
This property is available after setup but is not automatically added to HubSpot list views.
After adding the property, sales teams can:
- See the number of available Vieu connections for each account
- Sort companies by connection count
- Prioritize accounts with the strongest relationship coverage
Example Company View with Vieu Connection Count enabled

Once connected and approved:
• HubSpot will show as Active inside Vieu
• AEs can view Vieu connection data directly inside HubSpot and use connection count fields in Company views once they have been added by an administrator.
• Existing HubSpot data is not overwritten
• New records follow your approved mapping rules
If you run into issues during setup or want help with field mapping, reach out to us at valet@vieu.com.