
This setup helps you connect Salesforce to Vieu safely and correctly so your teams can start using relationship intelligence inside CRM without breaking existing workflows.
It’s typically handled by someone who manages Salesforce or owns CRM integrations, and it only needs to be done once.
Before you start
Make sure you have:
- Salesforce admin access
- An understanding of your contact and account fields
Engineering support is not necesserily required for this.
Here’s a quick video guide for you, use it or follow the instructions listed below at your own pace.
Step 1: Start the Salesforce connection in Vieu
- Log in to Vieu
- Go to Settings
- Click Integrations
- On the Integrations page, you’ll see the Salesforce card. Choose to connect either Connect Production or Connect Sandbox and continue.

Step 2: Authorize Salesforce (OAuth)
You’ll now be redirected to Salesforce to complete authentication.
You’ll be asked to:
-
Log in using Salesforce admin credentials
-
Approve access for Vieu
This uses standard Salesforce OAuth.

What permissions Vieu asks for
The Salesforce admin connecting Vieu needs:
- Permission to connect and authorize third-party applications
- Read, write, and edit access to Account, Contact, and Lead objects
- Read-only access to Opportunity records
- Read access to User records, to resolve ownership for Accounts, Contacts, and Vieu's custom objects
- Read and write access to Vieu's own custom objects and fields
- Permission to run Vieu's package code (Apex) inside your org
Vieu doesn't request access to Cases or any object outside this list.
| Object | Access | Why Vieu needs it |
|---|---|---|
| Account | Read, write, edit | Match connections to the right account and create new accounts if you've enabled that setting |
| Contact | Read, write, edit | Identify existing contacts, create new ones if enabled, and keep connection status up to date |
| Lead | Read, write, edit | Attach relationship intelligence to prospects who haven't converted to a Contact yet |
| Opportunity | Read only | Show relationship strength alongside open pipeline, without modifying deal data |
| User | Read only | Resolve ownership for Accounts, Contacts, and Vieu's custom connection records by matching Salesforce users to Vieu users |
| Vieu's custom objects/fields | Read, write | Stores connection and introduction data inside Salesforce, separate from your existing records |
| Apex execution | Run package code | Lets Vieu's package create Tasks and update fields when you take an action in Vieu |
Step 3: Install the Vieu Salesforce package
After OAuth is complete, you’ll see a prompt to install the Vieu Salesforce package.
This step is required. The package enables:
-
Vieu widgets inside Salesforce
-
Tracking conn & intros inside salesforce
If you are a Salesforce admin:
-
Click Install Package Now
-
Continue with the installation and configuration

Step 4: Choose who gets access
During installation, the Salesforce admin can decide which profiles the package should be installed for

This setting determines who can see and use Vieu widgets, fields, and relationship intelligence inside Salesforce.
You’re are done with package installation 🎉
After the Salesforce package is installed, a RevOps owner or Salesforce Admin must review and approve the sync configuration. This is a required one-time step.

Step 5: Add Vieu widgets to Account and Contact pages
Once the package is installed, the final step is placing the Vieu widgets in Salesforce.
A) Add the widget to Account pages
In Salesforce:
1. Go to Accounts and open any account
2. Click on Edit Page

3. In Components, find Account Connections (Vieu)
4. Drag and drop it onto the page layout
.jpg?width=670&height=345&name=Account%20-%20Widget%20(1).jpg)
5. Save the page
B) Add the widget to Contact pages
Repeat the same steps as above.
In Components, find Contact Connections (Vieu) and drag it onto the Contact page layout. Save the page.

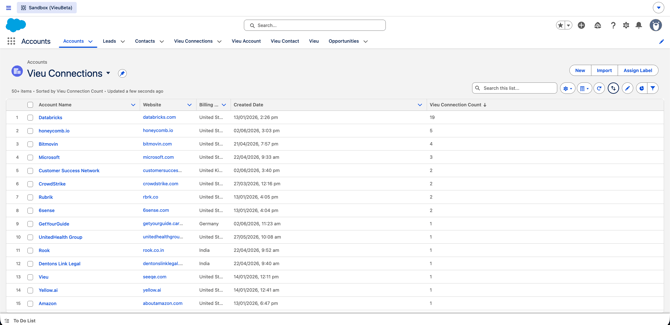
C) Add Vieu Connection Count to Account and Contact List Views
The Vieu Salesforce package includes the Vieu Connection Count field for Accounts and Contacts.
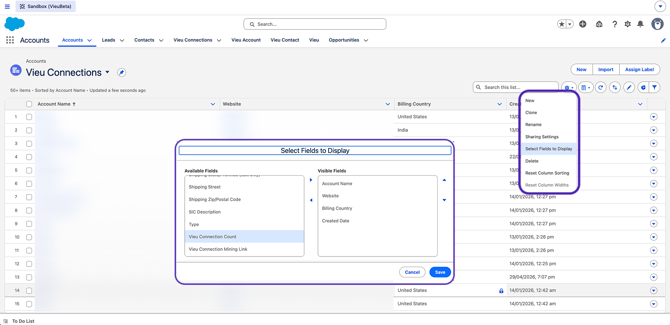
To make this information visible to AEs, SDRs, and BDRs, add the field to the Account and Contact list views used by your team.
Once added, users can sort and prioritize records based on available Vieu connections. Please repeat the same step for Contacts List Vieu.
Note: The field is installed as part of the package but is not automatically added to Salesforce list views.
Step 6: Review or customize field mapping
Field mapping tells Vieu how to correctly identify and update records in Salesforce.
Salesforce setups vary across organizations. Account names, contact identifiers, and user fields may be customized, renamed, or structured differently.
You can either use default field mapping to get started quickly Or customize mapping for contacts, accounts, and users. Here's how :
-
In Vieu, go to Settings → Integrations → Salesforce → Sync Configuration
-
Review Account, Contact, and User mapping, then click Save and Next to approve each section

Review and Approve Sync Configuration
After the package is installed and widgets are placed, a RevOps owner or Salesforce Admin must review and approve the Sync Configuration. This is a required one-time step.
Field mapping tells Vieu how to:
• Identify existing Accounts and Contacts
• Prevent duplicate records
• Assign ownership
• Create new records if enabled
Go to: Settings → Integrations → Salesforce → Sync Configuration
Review and approve each section below.
1. Contact Mapping
This defines how Vieu identifies and updates Contacts in Salesforce.
By default, Vieu maps:
Email → Email
First Name → First Name
Last Name → Last Name
LinkedIn URL → LinkedIn URL
Account Name → Account ID
You can customize these fields if your Salesforce instance uses custom properties.
We strongly recommend mapping LinkedIn URL for accurate identification.
Create New Contacts (Optional)
If enabled, Vieu creates new Contacts that do not exist and associates them with the correct Account. If disabled, new Contacts will not be created.
2. Account Mapping
This defines how Vieu identifies and updates Accounts.
By default, Vieu maps:
Account Name → Account Name
Domain → Website / Domain
LinkedIn URL → LinkedIn Company Page
Billing Country → Billing Country
You may customize these mappings based on your Salesforce structure.
Create New Accounts (Optional)
If enabled, Vieu creates Accounts that do not exist. If disabled, new Accounts will not be created.
3. Task Configuration (Optional)
Vieu can automatically create Tasks to notify Account owners or AEs about introduction updates.
Default configuration:
Task Priority → High
Task Type → To Do
Task Due Date → 5 days
You may customize or disable Task creation.
4. User Mapping
Users are mapped using Email ID to determine ownership of:
• Connections
• Accounts
• Contacts
If no matching Salesforce user is found, ownership defaults to the connecting user.
Click Save and Next to confirm each section.
Once connected, Salesforce will appear as active in Vieu. AEs can immediately start exporting connections, tracking introductions, and using Vieu Connection Count fields in Account and Contact views once those fields have been added to their Salesforce list views.

Note:
- Existing Salesforce data is not overwritten
- New records created from Vieu follow your mapping rules
To understand how AEs can use this setup, check out How AEs Use Salesforce with Vieu.
Need help?
If you run into issues during setup or want help with field mapping, reach out to us at valet@vieu.com.